guides
How to Use a Monitor Arm Correctly
Step-by-step guide to mounting, positioning, and tuning a monitor arm: correct height, tilt, cable routing, and gas spring tension.
 Daniel Osei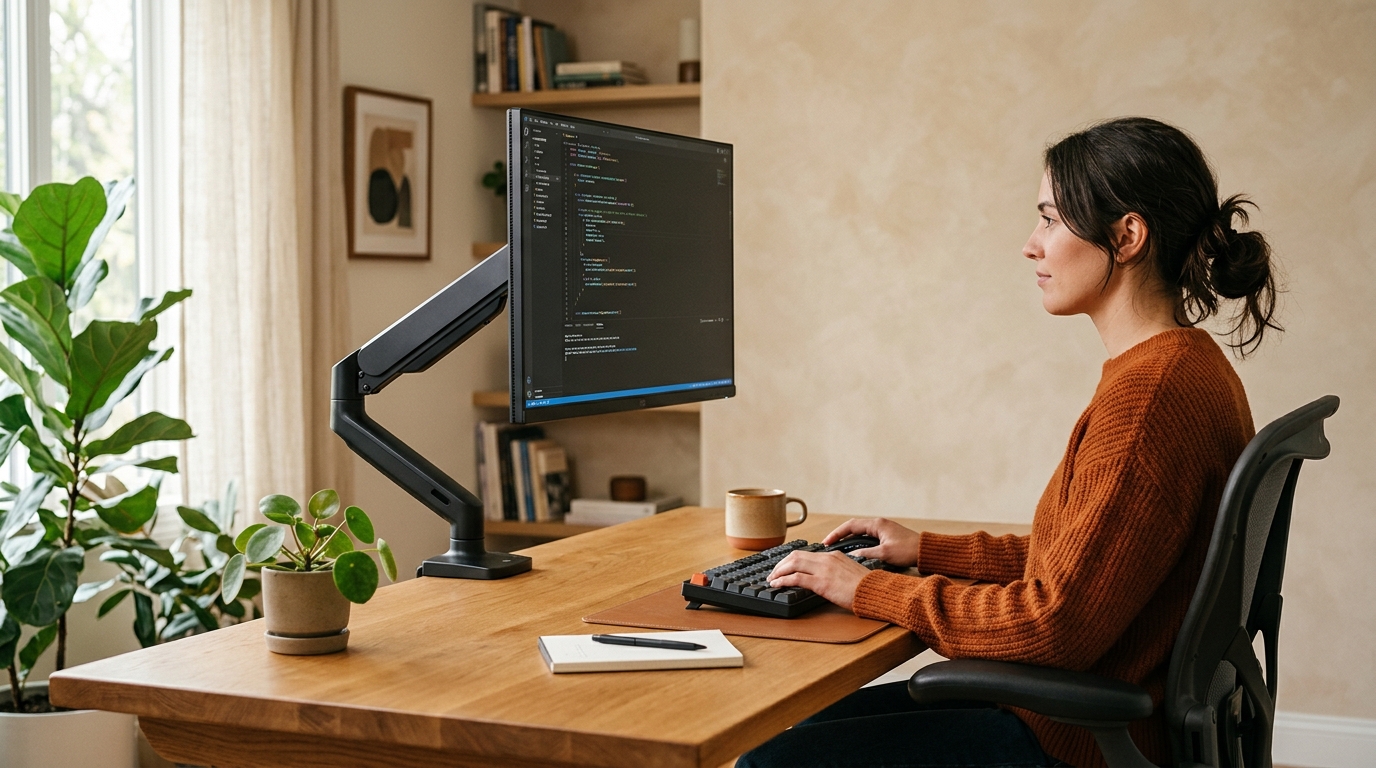
To use a monitor arm correctly: secure the clamp to a desk at least 1 inch thick, attach the monitor via its VESA plate, raise the screen so your eyes land on the top 15-20% of the display when seated upright, tilt the panel 10-15 degrees backward, route all cables through the arm channels, then tune the gas spring until the arm holds any position without drifting. The full setup takes 20-30 minutes.
What you need before you start
Before mounting anything, confirm three things.
Desk thickness compatibility. Standard clamp mounts fit desks 0.4 to 3.5 inches thick. Measure the desk edge before starting. Tempered glass desks, hollow-core doors, and desks with an internal metal frame do not accept standard edge clamps — these need a grommet mount through an existing hole or a wall mount instead.
Your monitor’s VESA pattern. The VESA standard defines the screw-hole pattern on the back of the monitor: 75x75mm and 100x100mm cover the vast majority of monitors from 24 to 34 inches. Look for four threaded holes on the back forming a square. Monitors without VESA — some Apple Thunderbolt displays, certain HP all-in-one panels, and ultra-thin ultrabooks with integrated displays — need a VESA adapter bracket sold separately.
Tools required. Most arms ship with everything needed: an Allen key (hex key) for the mounting hardware and a Phillips screwdriver for the VESA plate screws. A tape measure speeds the height-adjustment step.
Step 1: Attach the mounting hardware
Monitor arms ship with two mounting options. Choose the one that fits your desk.
Clamp mount setup
A clamp slides over the desk edge and tightens from below. No drilling required, no permanent marks.
- Slide the clamp base over the desk edge at your chosen location — typically 6-10 inches from your seated center, slightly toward your dominant hand for single-monitor setups.
- Keep the rubber protective pad between the clamp jaw and the desk surface throughout tightening.
- Use the included Allen key to snug the clamp bolt until the arm cannot be rotated manually. Finger-tight is not sufficient — the arm will drift under monitor weight. Stop the moment the rubber pad is fully compressed; overtightening cracks thin laminate edges.
- Verify the base post is vertical after tightening. A tilted base creates alignment drift that compounds through every joint of the arm.
Grommet mount setup
A grommet mount passes a bolt through an existing hole in the desk (typically 0.75 to 1.5 inches in diameter) and locks from below.
- Pass the grommet shaft down through the hole.
- Thread the bottom nut upward from below the desk surface and hand-tighten.
- Snug with the included wrench until the base does not rotate under significant lateral pressure. The desk surface compresses between the top washer and bottom nut.
Best for The benchmark single monitor arm for 24-34 inch displays up to 25 lbs
Ergotron LX Desk Monitor Arm
The Ergotron LX is the arm most ergonomists and IT departments recommend first. Its gas spring supports monitors from 7 to 25 lbs and holds any height or angle without adjustment across years of daily use. Cable channels run through both arm segments, the pivot rotates 360 degrees for portrait mode, and the tilt range of -5 to +75 degrees handles sit-stand transitions without readjustment. Ships with both clamp and grommet hardware. At $150-180 it costs more than basic spring-tension arms, but drift-free performance and cable integration justify the difference.
★★★★★ 4.7 · 28,000 reviews
Check current price on Amazon→Pros
- Gas spring holds any height from 3 to 21 inches above the desk surface without drifting over months of use
- Built-in cable channels through both arm segments keep all cables concealed from base to monitor
- Ships with both clamp and grommet mounting hardware — no second purchase needed
- Pivot joint rotates 360 degrees for landscape, portrait, and intermediate orientations
Cons
- At 25 lb max capacity it does not support heavy 34-inch curved ultrawides — those need the Ergotron HX
- First-time setup takes 20-30 minutes; the hex key tension adjustment is unintuitive without reading the manual
- The aluminum finish scratches with metal tools — use the included plastic guide during VESA plate attachment
Step 2: Attach the monitor to the arm
Every monitor arm ships with a VESA plate and both M4 screws (75x75mm) and M6 screws (100x100mm). Check the monitor manual for the correct thread size.
- Remove the monitor stand. Tilt the monitor face-down on a soft surface — a folded blanket on a table protects the screen. The stand releases with a button or clip at the neck base on most models.
- Thread the four VESA screws through the arm mounting plate and into the monitor back holes. Tighten in a cross pattern (top-left, bottom-right, top-right, bottom-left) to seat the plate evenly. Snug but not overtightened — the threads in monitor plastic strip easily.
- Lift the monitor and click the mounting plate onto the arm ball head or pivot joint. Most arms use a safety lock that clicks audibly when fully seated. Tug gently downward to confirm the lock before releasing the monitor.
- For monitors over 20 lbs, have a second person hold the monitor while you align and click the plate. A swinging arm and an unattended heavy monitor is the most common installation accident.
Step 3: Set the correct monitor height
This step determines whether the arm pays off ergonomically. Most people set height by feel and stop there — taking 2-3 additional minutes to calibrate correctly makes a measurable difference in neck comfort over hours.
The target: when sitting with your head level and your back supported, your eyes should fall on the top 15-20% of the screen. This positions the most-used area of the display in central vision and allows the neck to rest in neutral.
The common mistake: centering the screen at eye level. This seems correct but means looking down at the bottom half of the display constantly, which increases cervical flexion strain across the day.
How to calibrate:
- Sit in your normal chair position. Close your eyes, relax your neck, then open them. Note where your gaze falls naturally — this is your neutral eye angle.
- Adjust the arm height so the top edge of the monitor meets that natural gaze line.
- Work for 10 minutes and check: if your gaze consistently falls below the top third of the screen, raise the arm. If your chin tilts upward to reach the top, lower it.
For dual monitor setups, set the primary monitor first using the same rule. The secondary monitor goes beside the primary and can sit 5-10 degrees lower if used less often, reducing how far the neck rotates between displays.
Step 4: Adjust tilt, swivel, and rotation
Tilt. Tilt the panel backward 10-15 degrees from vertical — the bottom edge of the screen slightly closer to you than the top edge. This angle matches the slight downward gaze needed when the monitor top is at eye level and eliminates the overhead-light reflection that hits a perfectly vertical screen. Do not go past 15 degrees of backward tilt; beyond that, ceiling light produces glare instead of eliminating it.
Swivel. Center the monitor directly in front of your seated position. Off-center swivel requires sustained neck rotation to view the primary display, which accumulates cervical strain over hours. For single-monitor setups, centered is always correct.
Portrait rotation. If you read long documents or code and want portrait orientation, the arm pivot on most quality arms rotates 360 degrees. Verify you have enough height clearance — a 27-inch monitor in portrait mode needs roughly 32 inches of vertical clearance.
Step 5: Route cables through the arm
Cable routing is the step most users defer until after the arm is positioned and then regret, because threading cables through a tensioned arm holding a monitor requires removal of the monitor. Do this before finalizing the position.
Correct sequence:
- Before locking the arm into its final position, pass monitor cables — power, DisplayPort or HDMI, USB — through the cable entry at the arm base.
- Thread cables up through the arm segments and out the top joint near the VESA plate. Most arms have a channel cover or clip that snaps over the cable run.
- Leave 6-8 inches of slack at the monitor end so the arm can reach its full range of motion without pulling the cables taut.
- Use the included cable clips or hook-and-loop ties to secure the excess at the base. A cable drop from the arm base to the desk power strip or tower is typically unsupported — a cable management tray mounted under the desk collects this run cleanly.
Best for Organizing the cable drop from the arm base to the power strip or desktop tower
Under-Desk Cable Management Tray
Monitor arms route cables inside the arm, but the run from the arm base down to the power strip typically hangs unsupported. A J-channel tray mounted under the desk collects this drop into one organized path. 3M adhesive J-channels ($15-25) work on most desk undersides without drilling and remove cleanly from laminate. A screw-mount channel tray ($25-40) supports heavier cable bundles and can hold a compact surge protector under the desk, producing a fully clean desktop surface.
★★★★★ 4.5 · 8,500 reviews
Check current price on Amazon→Pros
- Collects the cable drop from arm base to power strip into one organized path rather than a loose hanging bundle
- Adhesive J-channel mounts remove cleanly from laminate surfaces without damage
- Screw-mount channel trays with integrated surge protector storage eliminate one more surface cable run
- Under $40 for most desk sizes and cable quantities
Cons
- Adhesive mounts on textured, raw wood, or painted surfaces may not hold reliably under heavy cable bundles
- Measure the cable run length before purchasing — an undersized channel splits the bundle rather than organizing it
Step 6: Tune the gas spring tension
Gas spring tension determines whether the arm floats correctly or drifts. A correctly tensioned arm holds any position you move it to without creeping upward or sagging downward.
Locating the adjustment. On the Ergotron LX and most quality arms, a hex set screw (typically 3mm or 4mm) sits at the base of the main arm pivot or inside the arm column. Turning it clockwise increases tension; counterclockwise decreases it.
Testing for correct tension:
- Move the arm to mid-height and release it. It should hold without moving.
- Move the arm to its lowest position and release. It should hold there.
- Move it to its highest position. If the arm drifts upward or downward from any of these test positions, adjust accordingly.
An arm that drifts upward needs more tension (clockwise). One that sags downward under monitor weight needs less tension (counterclockwise). Adjust in quarter-turn increments and retest after each.
After swapping monitors: If you replace your monitor with one that differs by more than 3-4 lbs, re-tune the tension. Gas spring arms are calibrated to a weight range, and a significant change in monitor weight shifts the arm outside the range where it floats correctly.
Monitor arm mounting options compared
| Product | Best for | Rating | Notes | |
|---|---|---|---|---|
| Clamp mount | Most desks 0.4-3.5 inches thick; reversible; no drilling required | ★★★★★ | Best for renters and anyone who moves desks. Does not work on glass tops, hollow-core doors, or desks with internal metal bracing. Rubber pad protects desk surface. | Check price |
| Grommet mount | Desks with an existing cable hole; heavier monitors; cleaner base appearance | ★★★★★ | More stable than a clamp for arms near their rated weight capacity. Requires a hole 0.75-1.5 inches in diameter — pre-existing or drilled. Permanent if drilled. | Check price |
| Wall mount | Desks without sufficient edge thickness; maximum desk space reclaimed; permanent installs | ★★★★☆ | Requires wall studs or a mounting plate. Eliminates any desk footprint from the arm base. Best for standing desks with thin top profiles or glass surfaces. | Check price |
Common mistakes to avoid
Skipping height calibration. Most people raise the arm until the monitor looks about right and stop. The ergonomic target — eyes at the top 15-20% of the screen — takes 3 minutes to set correctly and is the difference between a monitor arm that relieves neck strain and one that does not.
Using the wrong VESA screws. M4 screws in M6 holes feel like they tighten but will strip under monitor weight. Match thread size exactly to what the monitor manual specifies.
Routing cables after positioning. Threading cables through a tensioned arm already holding a monitor requires removing the monitor. Do cable routing before the arm is in final position.
Overtightening the clamp. A clamp that crushes the desk surface does not hold better than a correctly snug one. It creates micro-fractures in laminate that widen over months and can cause the desk edge to delaminate entirely.
Running the arm near its weight limit without adjusting tension. An arm rated to 25 lbs holding a 24 lb monitor has no tension headroom for range-of-motion changes. Stay 3-4 lbs below the arm rated maximum weight.
FAQ
Frequently asked questions
How high should a monitor be on a monitor arm?
How do I stop my monitor arm from drooping?
Do I need to turn off my monitor to install a monitor arm?
Can a monitor arm damage your desk?
What monitors are not compatible with monitor arms?
Bottom line
Using a monitor arm correctly takes less than 30 minutes and produces ergonomic benefits that last for years: neutral neck position, instant height adjustment for sit-stand transitions, and a desk surface cleared of a bulky monitor stand. The six steps — mount base, attach monitor via VESA, set height, dial tilt, route cables, tune tension — apply regardless of which arm you own.
For guidance on choosing an arm before installation, see our monitor arm buyer’s guide, best monitor arms roundup, and dual monitor arm guide. Deciding between an arm and a riser? Read monitor arm vs monitor stand.